Getting Started with Agentic Creator OS
TL;DR
Set up your own AI operating system in 30 minutes. Step-by-step guide to installing departments, MCP servers, and running your first automated workflow.

Set up your own Agentic Creator OS and run your first automated workflow.
Getting Started with Agentic Creator OS
The same system running my website, my music production, and my enterprise projects.
TL;DR
Clone the repo. Run the installer. Build the MCP servers. Configure Claude Code. Create your CLAUDE.md context file. Takes 30-60 minutes. By the end, you have 5 AI departments—Content, Dev, Design, Marketing, Business—working together on your projects. This is the exact setup I use to manage 12,000+ Suno songs, a Next.js website, and enterprise consulting.
This guide walks you through setting up the Agentic Creator OS from scratch. I built this after realizing my Claude Code sessions were getting too fragmented—different contexts, different skills, no coherent system. Now everything lives in one place.
Prerequisites:
- Basic command line familiarity (cd, ls, npm)
- Node.js 18+ installed
- Claude Code CLI installed (get it here)
- 30-60 minutes of focused time
Let's build.
What You're Building
The Agentic Creator OS transforms Claude Code from a chat tool into a full operating system with:
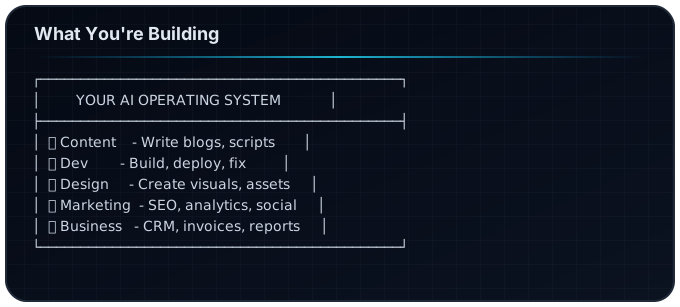
Think of it as having 5 AI employees that work together to run your projects.
Step 1: Get the Code
First, clone the repository:
# Clone the repo
git clone https://github.com/frankxai/agentic-creator-os.git

# Navigate into it
cd agentic-creator-os

# Look around
ls -la
You should see:
departments/- The 5 AI department configurationsmcp-servers/- Local tools for Claude Codeskills/- Workflow definitionsworkflows/- Automation templatesinstall.sh- Setup script
Step 2: Run the Installer
The installer copies configurations to your Claude Code setup:
# Make the script executable
chmod +x install.sh

# Run it
./install.sh
This installs:
- Skills to
~/.claude/skills/ - Agent configs to
~/.claude/agents/ - Workflow templates to
~/.claude/workflows/
Verification: Check that files were copied:
ls ~/.claude/skills/
# Should show: agentic-creator-os, content-department, etc.
Step 3: Build the MCP Servers
MCP (Model Context Protocol) servers give Claude Code local superpowers. Let's build them:
# Install dependencies
npm install

# Build all servers
npm run build:all
This compiles 6 MCP servers:
- filesystem - Read, write, search files
- database - Local SQLite operations
- browser - Automated web actions
- website - Deploy to Vercel/Netlify
- email - Send notifications
- creator - Business tools (CRM, invoicing)
Note: Building may take 2-5 minutes depending on your machine.
Step 4: Configure Claude Code
Now we need to tell Claude Code about our new servers. Open your Claude Code settings:
# Open Claude Code settings
claude config
Or edit directly at ~/.config/claude/settings.json:
{
  "mcpServers": {
    "filesystem": {
      "command": "node",
      "args": [
        "path/to/agentic-creator-os/mcp-servers/filesystem-mcp/build/index.js"
      ]
    },
    "database": {
      "command": "node",
      "args": [
        "path/to/agentic-creator-os/mcp-servers/database-mcp/build/index.js"
      ]
    }
    // Add other servers as needed
  }
}
Replace path/to/ with your actual installation path.
Step 5: Create Your CLAUDE.md
This is where the magic happens. The CLAUDE.md file is your AI's context - everything it needs to know about YOU.
Create a file in your project root:
touch CLAUDE.md
Add your context:
# My Intelligence System

## Who I Am

I'm a [your role] building [your project].

## Current Project

- Name: [Project Name]
- Goal: [What you're building]
- Stack: [Your technologies]

## My Preferences

- I prefer [X] over [Y]
- Always [do this thing]
- Never [do that thing]

## Active Tasks

- [ ] [Task 1]
- [ ] [Task 2]
Pro tip: The more context you add, the smarter your AI becomes. Update this file regularly.
Step 6: Test Your First Department
Let's test the Content department. Open Claude Code in your project:
claude
Then try:
> Help me write a blog post outline about [your topic]
Claude should:
- Read your CLAUDE.md for context
- Use your preferences
- Generate content in your style
Try more commands:
- "Create a Twitter thread about [topic]"
- "Draft an email to [recipient]"
- "Write documentation for [feature]"
Step 7: Run a Workflow
Now let's run a complete workflow. If you have the /publish skill installed:
> /publish "My First Blog Post"
This triggers:
- Content department writes the post
- Design department creates a hero image (if configured)
- Dev department deploys to your site
- Marketing department generates social posts
Note: Some workflows require additional configuration (API keys, deployment settings).
Step 8: Customize Your Setup
The real power comes from customization. Here's what to explore:
Add New Skills
Create custom skills in ~/.claude/skills/:
# /my-custom-workflow

When activated, do:

1. [Step 1]
2. [Step 2]
3. [Step 3]
Modify Departments
Edit department configs in departments/ to match your workflow.
Create Templates
Add templates for common tasks in workflows/.
Common Issues & Solutions
"MCP server not found"
- Check that the path in settings.json is correct
- Verify the server was built successfully
- Try rebuilding with
npm run build:all
"Command not recognized"
- Ensure skills were installed to
~/.claude/skills/ - Re-run
./install.sh - Check Claude Code is reading from the right config
"Context seems wrong"
- Verify CLAUDE.md exists in your project root
- Check file isn't too large (keep under 10KB)
- Update context with current project state
What's Next?
Now that you have the basics working:
Level 1: Daily Usage
- Use Content department for writing tasks
- Use Dev department for coding help
- Build your CLAUDE.md over time
Level 2: Workflow Creation
- Create custom skills for your repeated tasks
- Set up automation triggers
- Connect external services
Level 3: Full Automation
- Deploy MCP servers for email, browser automation
- Build end-to-end workflows
- Share your setup with the community
Resources
Official
- GitHub Repository - Source code and updates
- Claude Code Docs - Official Claude Code documentation
Tutorials
- Build Your Own Jarvis - How the architecture works
- Why Every Creator Needs This - The vision behind the system
Community
- GitHub Discussions - Ask questions
- Discord - Join the creator community (coming soon)
Recap
In this guide, you:
- ✅ Cloned the Agentic Creator OS repository
- ✅ Ran the installer to copy skills and configs
- ✅ Built the MCP servers for local tools
- ✅ Configured Claude Code to use the servers
- ✅ Created your CLAUDE.md context file
- ✅ Tested your first department
- ✅ Ran a complete workflow
- ✅ Learned how to customize
Total time: ~30-60 minutes
Your Turn
The best way to learn is to use it. Pick ONE thing you need to do today and try it with your new AI OS:
- Write that blog post you've been putting off
- Fix that bug that's been annoying you
- Draft that email you keep avoiding
Start small. Build the habit. Watch your productivity compound.
FAQ
How long does setup take?
30-60 minutes for basic installation. Another hour or two to customize CLAUDE.md and create your first custom skills. The system becomes more valuable the more context you feed it.
Do I need coding experience?
Basic command line familiarity is required (cd, npm, git clone). You don't need to write code—just follow the steps. The MCP servers come pre-built.
What's the difference between this and just using Claude Code?
Raw Claude Code starts fresh each session. Agentic Creator OS gives it persistent context about you, your projects, and your preferences. It's the difference between a smart assistant and one that actually knows your work.
Can I use this for a team?
The current version is designed for solo creators. Team features (shared contexts, role-based access) are on the roadmap. For now, each team member would run their own instance.
What if I get stuck?
Open an issue on GitHub. The community is active and I respond to questions directly.
Related:
Build your first AI system
Step-by-step guide to setting up ACOS, creating your first agent, and shipping real products with AI.
Start buildingProduction-ready architecture
Download AI architecture templates, multi-agent blueprints, and prompt engineering patterns.
Browse templatesJoin the builder community
Connect with creators and architects shipping AI products. Weekly office hours, shared resources, direct access.
Join the circle
Read on FrankX.AI — AI Architecture, Music & Creator Intelligence
Stay in the intelligence loop
Weekly field notes on AI systems, production patterns, and builder strategy.
Continue Reading

ACOS Quick Start: Zero to Production in 10 Minutes
Get Agentic Creator OS running in 10 minutes. Clone, install, configure, and run your first workflow. The fastest path from zero to AI-powered productivity.
Read article
Building Custom Skills for ACOS: The Complete Developer Guide
Create your own ACOS skills with auto-activation, progressive disclosure, and real examples. From skill anatomy to publishing—the full tutorial.
Read article
MCP Server Integration: Connect ACOS to Everything
Master the Model Context Protocol. Learn how ACOS connects to browsers, databases, APIs, and external tools through 7 MCP servers. Build your own integrations.
Read article